Sometimes, failed weatherstripping adhesive can be annoying. You may feel this difficult when you don’t know how to fix this problem. It is important to note that failed adhesive may bring many unwanted issues. Technically, when weatherstripping adhesive fails, the air contaminants can quickly get inside. It brings uncomfortable and hazardous situations. Therefore, fixing adhesive failure is crucial to understand.
On the other hand, if you peel off the old weatherstripping adhesives and apply a new sealant, the new glue may immediately fail. It is because there are some requirements for perfect adhesive attachments. Therefore, the primary purpose of this article is to highlight the fundamentals of adhesive failure. In addition, it will also discuss proper removal and preparation processes. Before that, it is also essential to understand the types of adhesives used in weatherstrippings. Moreover, it is also crucial to understand the common causes and signs of adhesive failure.
Types of Adhesives in Weatherstripping
Depending on different weatherstripping materials, the type of adhesives also varies. Every kind of the following weatherstripping adhesive works uniquely for specific applications.
Resin Adhesive
Resin adhesive is a strong and durable glue used in many applications. After application, resin adhesive forms an extremely tight and strong bond between two surfaces of the materials. It doesn’t shrink or contract due to high temperatures or excessive humidity. Resin adhesive is resistant to water, UV rays, and some chemicals. As a result, this type of adhesive is prevalent in underwater applications.
However, there are three types of resin adhesives based on different materials. Rubber adhesives, pressure rubber, and thermosetting rubber are noteworthy examples. The curing temperature of these types of adhesives is 150ᵒC and 130ᵒC for 1 and 2 hours, respectively.
Acrylic Adhesives
It is also a resin-based adhesive comprised of acrylic or methyl acrylic polymers. These adhesives are more potent than typical resin adhesives. In this case, acrylic adhesive’s cohesion and adhesion factors increase strength. As a result, these adhesive types are prevalent in most construction applications. However, it comes in both liquid and paste forms. Applying liquid acrylic glue often involves using a brush or a moist cloth. On the other hand, paste acrylic adhesives are more widely available and may be applied to almost any surface.
Silicone Adhesives
This type of adhesive is a versatile polymer. Its main ingredient is silica, a common form of sand. However, silicone adhesive is a polymer with siloxane bonds and organic compounds. This type of adhesive is popular as an alternative to toxic adhesives. It is prevalent in many industries for safe operation in securing and bonding surfaces. Moreover, silicone adhesives are necessary for resisting weather and moisture.
Other Adhesives
Other types may include heat-activated adhesives, thermal-release adhesives, and conductive adhesives.
Understanding Adhesive Failure
Adhesive failure refers to the bond failure between the adhesive and the substrate. It occurs due to some contamination or oxide materials. You may notice some signs of adhesive failure. If you face these signs, you should immediately change the adhesive or weatherstripping adhesives.
Signs of Weather Stripping Adhesive is Failing
How do you notice if the weatherstripping adhesive is failing? Adhesive failure may lead to a lot of hazardous situations. Therefore, it is crucial to consider adhesive failure. However, the following are the most common adhesive failure signs that you may find. It is important to note that these signs are the main symptoms of epoxy failure.
- Noise: You may encounter different noises inside your vehicle or apartment. It can be either wind or outdoor noises. You can confirm adhesive failure if the noise at the weatherstripping edges is noticeably louder.
- Visible Lights: If outdoor lights are visible around the edges of doors and windows, you can confirm adhesive failure. However, even though the weatherstripping is in good condition, if you find this type of sign, you can ensure adhesive failure.
- Dislocation of weatherstripping: The weatherstripping dislocates its original position while opening the chamber. It causes interference between the opening and closing of the doors or windows.
- Water leaks: Adhesive failure may also create water leaks. It may cause mold, wet carpets, or water dumping on the floor. You could use a garden hose to push water around the seals to ensure the leaks. If the weatherstripping leaks, then you can confirm adhesive failure.
Types of Adhesive Failure
Adhesives are an integral part of airtight and watertight enclosures. This bonding agent typically works for 50 to 100 years. In this case, how do you choose the right adhesion type?? In addition, what are the different types of adhesive that provide long-lasting performance? To understand all these parameters, we should first know the kind of adhesive failure and its reasons.
Substrate Failure

Substrate failure occurs when the adhesive becomes more robust than the actual material. As a result, it breaks the primary weatherstripping material. The substrate failure test is famous for testing adhesives for the desired result. While doing the test, if the substrate breaks before the bond, it confirms the improper adhesive installation. This type of failure usually occurs due to poor joint design.
Adhesion Failure
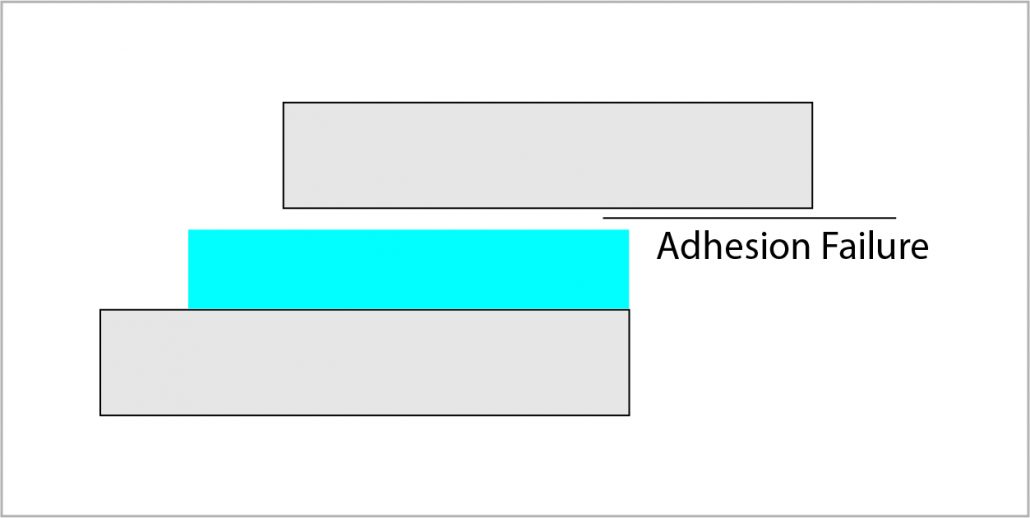
Adhesion failure occurs when the adhesive loses adhesion properties from any bonding surface. This failure usually occurs due to the absence of glue on one of the material surfaces. The surface treatment process is widely practiced to eliminate this problem. An in-depth analysis is crucial to identify this adhesive failure. The sign of adhesion failure can be found at the bonding interface.
Cohesive Failure
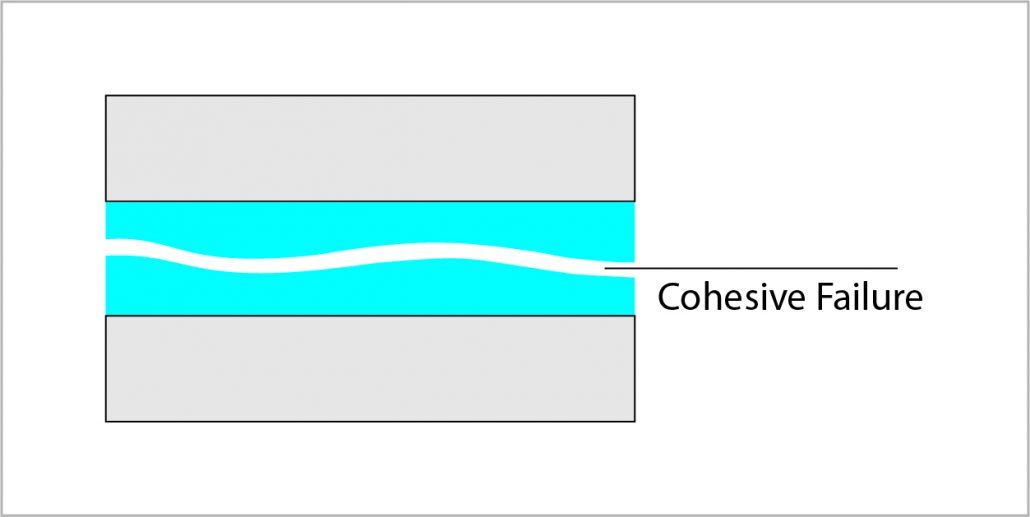
When the adherend fails before the adhesive, it ensures a cohesive failure of the substrate. This substrate is supposed to indicate excellent adhesion. However, cohesive failure occurs when a fracture allows a layer of adhesive to remain on both surfaces.
Reasons for Adhesive Failure
We have already known the signs and types of adhesive failure. To understand adhesive failure completely, we should also see why it happens. There are a good number of reasons for adhesive failure. The following four are the most common among them and often create adhesive failure.
Contamination
A contaminated surface creates adhesive failures. In such cases, the most common contamination can be grease, oil, or other contaminants. Therefore, before applying the adhesive, it is essential to ensure the surface is clean and adequately prepared. Surface treatment in this situation may include various cleaning and abrasion treatment methods.
Improper Application
Improper installation of adhesive may create adhesive failure. In this case, you must ensure the consistency of the mixture. You should mix the correct amount of elements to get the optimal bond strength. On the other hand, you should apply adhesive in proper proportion. Too much or too little glue may also create adhesive failure.
Substrate Compatibility
Substrate refers to weatherstripping applications on different materials. However, incompatibility between substrate and adhesive may create adhesive failure. For instance, plasticizers in some types of plastic may slowly seep through the surface. Therefore, it is crucial to check the compatibility of the substrate and chosen adhesive.
Environmental Conditions
Some environmental elements highly impact adhesive failure. High humidity, carbon dioxide, PH levels, and a certain quantity of oxygen change the properties of adhesives. Therefore, you should know these factors before choosing the appropriate application adhesive.
How to Remove Weatherstripping Adhesive
When you have determined the type of adhesive failure, you are ready to replace your weatherstripping. In this situation, we have prepared the following steps for replacing a new sealant for your doors and windows.
Remove Existing Weatherstripping
Before removing the glue, you should remove the weatherstripping first. In automotive vehicles, you may find the seals in a combination of adhesive and fasteners. Gently peel off the weather stripping using an appropriate hand tool. While removing the weatherstripping, ensure that the substrate is not damaged.
Remove Old Glue
When you have removed the weatherstripping, the adhesive layer is now open. The adhesive typically penetrates microscopic pours and defects in the weatherstrip. Therefore, you can only partially remove the bonds using physical tools. The following three are the most common methods of removing adhesive.
- Heat: Increased temperature softens the dried glues. Therefore, using a heat gun, it is easy to remove adhesives.
- Tools: Rubber or plastic putty knives or scrapers are ideal for eliminating glue without damaging the surface underneath.
- Solvents: It is the most effective way of removing weatherstripping. The adhesive removers usually mix with the adhesive, forming a new substance that is less sticky and safe to remove. It is important to note that these solvents can quickly remove paint on your vehicle. Therefore, avoid those products that may affect your car’s paintwork.
Preparation of Fresh Adhesive
After removing the weatherstripping and adhesive, you must clean the surface properly. In this situation, you should ensure no contaminants are left on the application. However, you can prepare and install the new seal strips per the instructions. We have three definitive guides explaining different installation processes on various applications. These are for automotive, shipping containers, or apartment doors and windows.
Final Thought
The weatherstripping adhesive is an integral part of sealing weatherstripping. While choosing the appropriate adhesive, you should consider some factors discussed above. We hope this definitive guide will significantly help in your DIY projects. However, please get in touch with us if you still need clarification on any of these topics. We have a team of experts who are waiting to give you a response.